
Learning how to brew at home is one of the most important steps in becoming an adult in the United States. Luckily, it’s not that hard. This post offers the best step by step process that anyone can use to brew coffee perfectly at home.
Drip coffee makers are the most popular coffee makers in America. Drip machines are easy to use and easy to clean. They’re affordable, and you can by them at just about any store.
A drip coffee maker was my first coffee maker because it was simple for my 18-year-old brain to use.
Most adults in the US have used a drip coffee maker and drank a cup of drip coffee. Brewing drip coffee at home seems to be as easy as blinking.
I thought so too — until I realized my home-brewed drip coffee didn’t taste as good as my local coffee shop’s drip coffee.
I was perplexed.
So I did what I do and researched drip makers like it was my job. Luckily this would come in handy professionally too.
I’ve done extensive reading and trial by error so you don’t have to.
Here’s the best way to brew coffee at home using a drip maker.
How to Brew Coffee at Home Using a Drip Coffee Maker – The Basics
I’ve had my fair share of bad homemade coffee. It can be so bitter or off-putting that you find yourself mindlessly waiting in line at Starbucks for a $6.50 latte. Lattes are a personal favorite of mine, but they can eat up a lot of money fast. 5-6 lattes a week will end up costing you almost $35.00 a week. That’s $1,820 a year on lattes all because of bad homemade coffee.
I have written extensively on the importance of the grind on your beans to achieve optimum extraction of flavor from your beans. Read my post about how to grind coffee beans first.
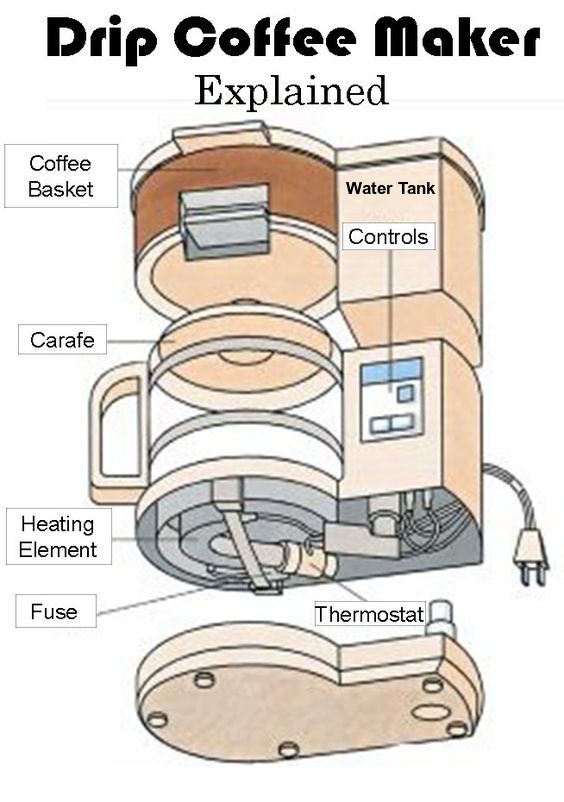
Drip makers are pretty straight forward. They have a water tank for the water, a basket for the grounds, the classic glass pot, and usually 2-3 button to operate the machine. Some mchines can be programmed to auto brew or even grind your beans for you. I’m going to use the most basic drip machine set up for simplicity purposes.
This diagram explains the layout of the most basic drip coffee machines:
Now that we know how a drip machine works, let’s look at how to brew a pot of coffee at home in your home drip maker.
Step #1- Measuring Coffee and Water
If you don’t have your own burr grinder, preground coffee is going to be your best best. Make sure to store the coffee grounds in an airtight container away from sunlight to preserve the coffee’s flavor.
You’re going to use the 2:1 ratio when deciding how much ground coffee to measure. The 2:1 ratio is 1 tablespoon of ground beans for every 8 oz. of water. This can be confusing, but once you have a better understanding of what 8 oz. looks like the easier it will become.
Most coffee pots have “cups” measured out on the sides. You need to know what we call a cup is a different measurement than what your maker thinks is a cup. When measuring grounds, keep in mind that a coffee maker’s cup measurement is 6 oz.
When you look at the side of your coffee pot and it says 2 cups, it means you should measure out 1 tablespoon for 2 cups (12 oz.) of water for your drip maker. You can multiply out from there. Most drip coffee makers are able to make a max of 12 cups in one brew cycle. When you’re making a full pot, you want to measure out 6 tablespoons of ground beans.
A lot of people say to brew your coffee with filtered water, but I find this step to be a little snooty — not everyone has access to filtered water.
Sure, it will most likely taste better, but the main point I want to convey is the importance of the ground coffee to water ratio. If you’re feeling a little timid, ignore the measurements on your coffee pot and use a measuring cup. Most measuring cups have an ounces measurement.
Now that you know how much water to use with how much coffee, let’s talk about where to put the water and ground beans and what kind of filters to use.
Step #2- Assembly of Your Coffee
You should have a better understanding of the measurements for your perfect pot of coffee, but where does all of this go? If you reference the diagram above you will notice 2 important features:
- The basket
- The water tank
You can probably guess what goes where but I’m going to review the next steps for accuracy.
Pour your premeasured water into the water tank. Easy right? Make sure that the water tank gauge, usually on the side, reads the correct amount. I find my home drip maker doesn’t always translate the cups on the pot to the cups measurement on the gauge. It’s usually a tad under, so I add more water. This is important because now the machine is loaded with the water it will use to brew your grounds.
Next, measure the grounds and add them to a filter in the basket. This is where the basket comes into play. The basket is where the heated water streams over the grounds to produce the coffee we all love so much. Most drip machines require a coffee filter to go in the basket to keep the grounds out of your final pot of coffee.
The most popular type of filter is the paper one associated with home coffee makers. They’re cheap, efficient, and can be found in any grocery store.
This is not what I recommend using. For a variety of reasons, I quit using them about 5 years ago. I was tired of dealing with the mess.
Once the hot water has run through the grounds, these paper filters it’s close to impossible to get them out without making a mammoth mess. The once seemingly sturdy filter is just about as structurally sound as a wet noodle. Yes, you can take the basket to the trash and just dump everything out, but there’s something repulsive to me about having my coffee filter so close to a trash can.
Another big turn off of a paper filter is the waste. I brew about a pot a day at home. My toddler requires me to be caffeinated. It dawned on me one day that I brew at least one pot a day. That’s around 365 paper filters I’m putting into the trash.
This didn’t sit right with me.
My solution?
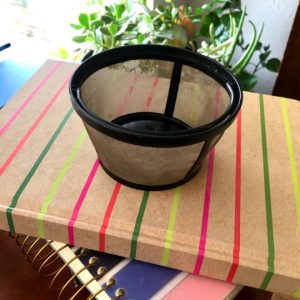
I bought a reusable coffee filter by Goldtone. Here’s mine after 5 years of daily use and it’s still holding up strong:
I’ve never looked back, nor have I had to wrestle a soggy filter from my basket into the trash.
A reusable filter is dishwasher safe and so much easier to use and kinder to the environment. Goldtone and other reuseable filter brands have a filter model that will work for just about any drip machine.
Another, unexpected, advantage of a reusable filter is the fine mesh that it’s made of. You’re going to get a cleaner and crisper cup when you use one of these. They’re so easy to clean, just turn the filter upside down to get rid of the majority of the leftover grounds then rinse in your sink before washing it.
Now it’s time to brew.
Step #3- Brewing a Perfect Pot of Coffee at Home
You now know how to measure the 2 ingredients for a perfect pot of coffee. You know where and how to deposit these 2 ingredients into the machine.
Now what?
Most drip machines work the same. There’s usually a brew button that starts the process for you.
On my Mr. Coffee model there are 3 buttons across the front of the machine:
1- Strong Brew
Automatically slows down the rate the water is being pushed through the basket to give a stronger flavor. I always press this button. Did I mention I need caffeine?
2- Fresh Brew Timer
This button prompts future auto brewing functions on my drip maker. This is to program my maker to start brewing in automatically. This is especially handy when I know I’m going to be rushed the next morning.
3- Brew Button
This is the most used button on any home drip machine. This is the start button for your machine. When you’re ready to brew your pot of press this button and the magic happens.
Once you have the beans brewing you just have to wait. My drip machine takes about 7 minutes to brew 12 cups. My machine usually beeps once it’s done brewing. Most machines will keep your coffee warm for around 2 hours. Mine beeps again when it’s turning off the warming plate the pot sits on.
Now you can enjoy your own pot of perfectly brewed cup at home. You can drink it black, add almond milk vanilla creamer like I do, or add just about anything else you like. There’s one more step to keep your drip machine making the perfect pot of coffee.
Step #4- Clean Your Coffee Machine
The one thing most people don’t do is clean their machine after they’ve enjoyed their home-brewed coffee.
Obviously, you need to dispose of the used grounds, but what else is there?
This is what I do every time I use my machine and you should too. After all, this is a machine. They require upkeep to work at their optimal performance.
1- Empty the coffee grounds, rinse out the reusable filter and place it in the top rack of my dishwasher.
2- Remove the pot from the machine and fill it with 12 cups of tap water. Pour this new water into the tank. You’re going to run a normal brew cycle through the machine to clean out any impurities or leftover flavors. You might be brewing a different roast or flavored bean tomorrow. This will help to keep your next pot from tasting stale. Simply pour the “brewed” water down the sink and place the pot in the top rack of your dishwasher.
3- Rinse out your coffee basket. Put the basket back in the machine with the lid open so everything can dry out. Mold is the number 1 offender in bad tasting brew. About twice a week I run the entire basket, coffee pot, and any other dishwasher safe parts through my dishwasher to thoroughly clean. Once they’re done I set them on a towel to air dry before I use again.
I know this seems like a lot of extra work, but it will be worth it.
I promise.
Conclusion
I hope you were able to learn some new things in this post about how to brew a pot of coffee at home. Brewing the perfect pot of coffee at home isn’t rocket science. The perfect pot requires a little knowledge and practice. I wish more coffee maker manuals came with how to make a pot of coffee steps.
Look out for tips from the roaster on their bags of coffee. You can adjust up or down according to their directions.
I would love to hear any tips or tricks you might have for the perfect pot of coffee at home.